Sunday, January 30, 2011

Polygon & Sub-D Workflows: Part A

Starting the next tutorial, this time building a Raptor. Boy it's refreshing to work with organic shapes! Started out by putting image planes of drawings of the Raptor from the Front, Top, and Side, then began building the forms.

You can see that there is a weird thing happening with the connection of one of the toes onto the foot in the second picture. I figured out that I had the normals reversed before I connected the pieces together and solved the issue. (I also had that problem with the Arm) Not sure how the normals got flipped on me, but oh well!

Introduction to Modeling: Part B

This project started out really badly (Part A), where I built the little cap that is reused in each layer of the Swiss Army Knife. I had to switch between Sub-D & Polygons, which caused me a lot of problems. I think I have a better handle on how to work between the two methods now, because the rest of the knife came together pretty smoothly. Used a lot of different techniques with Polygons, Sub-D, and Nurbs. Plus learned how to do some simple clean-up to get 4-sided polys.

I was disappointed that the texturing aspect of this lesson didn't teach how to create the same photo-realistic look from the demo pictures. It just used some basic blinns for everything, so I played around with adding my own materials, lighting, and a basic backdrop. The one thing I wasn't able to do was get a Swiss Army logo to project onto the enameled surface. Will probably learn more about this in texturing lessons.

Saturday, January 29, 2011

Noir!

These are some concept pieces I did for a team project in my animation class. My partner and I will be creating a looping animation that pulls the viewer through a day in the life of a private investigator.

Tuesday, January 25, 2011

Introduction to Modeling: Part A

Onto the next Digital Tutors tutorial, this one is call intro to Modeling and takes the user through the steps to create a swiss army knife. It's been quite challenging so far - more so than building the space ship because I am asked to match shapes from images planes. I am also doing more complex operations like attaching Nurbs surfaces in addition to being careful to build "good" geometry. Here are two images from my process so far.

Saturday, January 22, 2011

Thumbs & Color Studies

Here are some sketches that I did in preparation for the project I'll be building. I also did color studies of my 3 favorite scenes. I really want to do an image of the dog & females characters on the top of a building as well, but don't want to make an impossible amount of work for myself. I'm trying to incorporate a wide variety of materials (glass, fabric, metal, etc) into each image.

The characters that I'm working with are:

The Inventor: the father figure, inventor, and spy handler
The Android: a robot femme fatale designed in the image of the Inventor's mother
The Puppy: the Inventor's adopted son

Introduction to Maya 2011: Part C

The last part of the tutorial taught me how to light a scene with directional lights, create an image plane to hold a matte background, create a dome to bounce reflections, and batch render.

The images below show before and after in my lighting process. The last image with the desert background is from Digital Tutor's tutorial as a comparison.

I'm pretty satisfied with the lighting results that I got. I definitely chose a harder background to work with than the tutorial came with. My background has harder directional shadows plus some beautiful blue shadows and pink highlights and it was important for me to learn how to simulate this.

You can view my final render here. Almost thrilled with the results but a couple things that bug me are outside of my knowledge base: the cast shadows on the ground are the wrong color and the smoke doesn't cast a shadow.

Friday, January 21, 2011

Osgood in 3D

I just wanted to plug my in-process blog about learning how to use 3D and it's application in a self-direction illustration project. Click the link to see what I'm up to.

Introduction to Maya 2011: Part B

In the next section of the Intro project I learned how to organize the files into groups and parented structures as well as some simple rigging using nurbs circles as parents for main objects. The most complex thing was creating a joint-chain that connects the cables from the racer to the engines. I did the chain backwards and had to start over (which was frustrating but a good lesson), however the result of a rope-like effect was worth it.

I also learned how to write some expressions to create a random movement in the engines as well as creating a couple new attributes that would make animation simpler. (I love CG movement, as evidenced in my devotion to the "wiggle" expression in AfterEffects!)


Next I learned how to keyframe animation and create animation that follows a path. You can see my basic animation here.

The next part was learning about dynamics which I've toyed with rather extensively in AfterEffects, so the concept was not new. It was, however, very exciting to play with particles in 3D for the first time. We used "Fire", "Lightning" and a generic particle system for the Smoke. I'm not happy with my Smoke result - somehow the instructor's project (done with the same variable input) turned out much more realistic. I messed around with this for a few hours and decided to let it rest as is!
We haven't actually gotten around to lighting, rendering, or cameras YET, but I wanted some instant satisfaction so I rendered out this spectacular composition. So excited to do this with my own ideas...!

Art to Wear Reject

Here's my logo entry for NC State's "Art to Wear" event. It didn't win, but I still like it! Looking forward to see the winning logo.

Wednesday, January 19, 2011

The X-Men

Playing around in Flash, fun!

Friday, January 14, 2011

Moodboard

I've been thinking about the illustration project that I'm going to complete with this independent study since Winter Break started. I can't wait until I know how to put my vision together in Maya!

The following images are collectively my moodboard for this project...

Introduction to Maya 2011: Part A

Downloaded Maya 2011 last Sunday and have been working on Digital Tutor's Intro to Maya project each night since. The project is to model, texture, animate, and light a space ship from scratch. So far I've gotten through modeling and texturing (more details below).

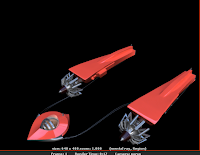
Here are images from my modeling process. I'm basically following what the demo is doing, but I've changed a lot of the shapes and made small modifications here and there. I thought I would have more opportunity to be creative, but the digital tutor doesn't describe what he will make, he just starts to make it so I'm usually working blindly. I'm okay with this, since it's my first project I'm more interested in learning the tools than creating something original.

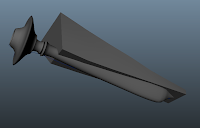
The modeling process hasn't been too difficult. The interface of Maya is definitely more complicated than I expected (so many menus!) I'm getting used to it, though. I've used a couple different methods of modeling (nurbs, polygons, subdiv) but I still have only a vague knowledge of what the difference is between them. I'm hoping that the next tutorial set I do (Intro to Modeling) will give me a stronger impression of what each type's value is. I also had a big hang-up when I was making the cab because the pivot on all the pieces somehow got off-rotation and I didn't figure out how to fix the problem until I was nearly done. I did figure it out, there was a button under the toolbox that I had pressed wrong (I think it was set to "object" instead of "world?")

I've also discovered that these tutorials probably take 3x to 4x longer than the actual video run-time because I have to watch, then figure out how to replicate the action. So for this video I've watched about 6 hours of footage this week, but probably spent at least 24 hours. Hopefully I'll speed up!

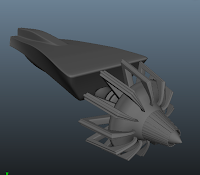
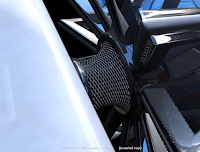
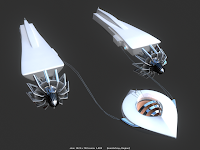
The next thing I did was texturing, which was a lot of fun. The tutorial called for a red car-paint finish with glossy gray accents, but I wanted to do a white plastic/chrome effect instead. It's not perfect, but I'm pretty satisfied with the results of the materials considering my elementary knowledge of the software and it's capabilities. I also patted myself on the back when I figured out how to bump-map the grid texture in the second image before the instructor got to that section.

I spent a lot more time than I should have messing around with the materials and rendering. The tutorial file provided a dome that has a picture of the sky wrapped around it, which is reflecting back into the chrome-y materials. I thought this was a neat effect and am looking forward to understanding more about lighting and reflections, which I'll get to next week. I'm also excited to do a bit of rigging & animation (even though I don't intend to go much farther on either of those topics for this particular independent study). I think it will give me a good basis for when I do want to rig and animate later on.
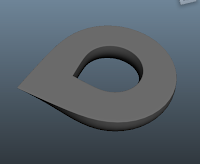
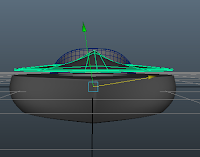
Monday, January 10, 2011

Lady in White

Here's a quick study for an expansive project I'm working on. The plan is to make a little story out of three illustrations drawn & rendered in Maya. (Kind of like Ray Caesar) I want to do something retro/futuristic with spies and robots. Have a big plan and lots of inspirational images but don't know exactly what it will look like yet...

On another note I was afraid that I was forgetting how to digital-paint, as it's been several months since I've tried. I'm glad I haven't completely lost it!