Showing posts with label model. Show all posts

Monday, February 27, 2012

Whiz Palace

Here is the concept art and a test render from my next collaboration with Kirby Culbertson, "Whiz Palace." Its for the 11 Second Club's February competition, featuring a clip of Amy Poehler from Parks and Recreation. Like with the Flamingo project, I did the modeling, lighting, and rendering while Kirby is doing the animation and rigging. He set up some amazing rigs for the figures that we hope to reuse on another project.

Saturday, January 28, 2012

Flamingos and Crocodiles

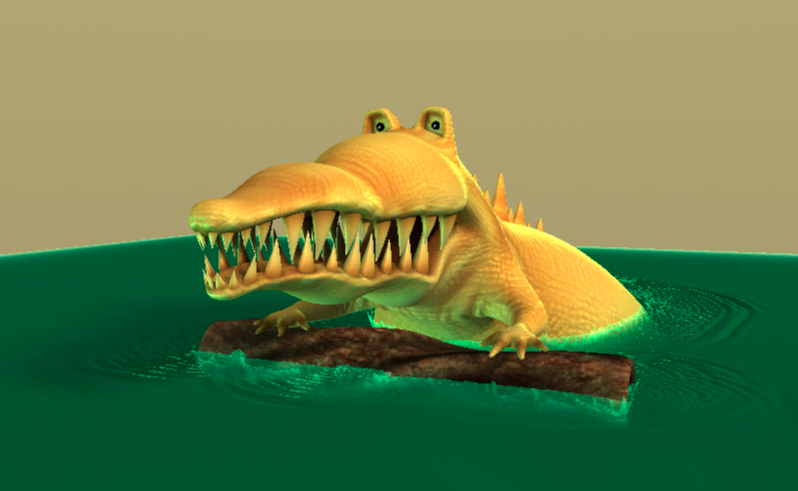
I'm teaming up with my schoolmate/coworker Kirby Culbertson for an 11 Second Challenge project. The January 2012 challenge is an aggressive sounding clip from an Indian film that we decided would make a fun scene with a lunatic Flamingo and a hungry Crocodile. My role was modeling, texturing, dynamics, and rendering. Kirby did all the rigging and will be animating the scene. Here are some images of the progress.

Monday, October 10, 2011

Buster's Hands

Did some work on his hands. Still need to tighten the design up, his fingers are losing a lost of volume from all the sculpting.

Saturday, October 08, 2011

Successful Normal Map transfer

Here's my progress on Buster. Spent a few hours on hardening the angles in his hair and on his body. Also tried exporting a Normal Map to a low-poly mesh and am pretty happy with how the results are reading in Maya. There are a few artifacts I have to work out, but otherwise it looks much higher-poly than it is.

Thursday, September 29, 2011

Buster Updates

Got some feedback on my model and incorporated some edits on the anatomy as well as a sharpening up of many features to make it more geometric.

Wednesday, September 28, 2011

Buster: Model

Here's a preview of the Buster Model. The first image is from Mudbox with 5 levels of subdivisions and the second two images are exported normal maps on the base model in Maya. Still tweaking him in Mudbox. This was an (unsuccessful) test from Mudbox to see how a normal map would render out for a base level mesh, but there is not nearly enough geometry to support it, causing the ugly shadows. Also a little lost on the textures. I'm caught between wanting to do photorealistic textures and stylized painterly look and just need to decide.

I am, however, pretty happy with the way that helmet is picking up light!

Friday, March 11, 2011

Dress up!

This has been a lot of fun - began modeling the clothes for the female figure, Anna. She'll have a couple different outfits. I also have to do a gigantic billowy skirt which I presume will be no fun at all for me to model! Spent some additional time experimenting with "sheer" materials (not shown) that I think will turn out pretty cool.
It's funny how long it takes to make the little details, like placing every single diamond and jump ring for her necklace, when it's doubtful that the camera will ever get close enough to see. I'll probably take a bunch of close up glamour shots once the scene is set up to get that extra bit of satisfaction. (Also need to spend more time figuring out how to render diamonds - didn't get the kind of sparkle that I want!)

Thursday, March 10, 2011

Gaston

I've been slowly chipping away at this model for a couple weeks and finally finished him, did UV layouts (what a learning process that is), and custom maps. I'm regretting my decision to make his poodle puff a separate piece of geometry. Would be nice to see it smoothly flow from his head, but I think changing that will completely ruin my UVs and I don't want to take a step back at this point.
I played with a couple ideas for how to do his hair, actually. Was considering making it out of transparent layers of polygons like in a video game. Also played with "Fur", but didn't think the results would mesh well with the rest of the scene. I ended up sculpting it in Mudbox and hand-painting finer strands in Photoshop. Looks a little plastic-y, need to play with that when I get it into the correct lighting situation.
Added in a lot of little details like his belt buckle and shoe laces that were fun to put in, but probably are too small to be seen in the final render. I blew the bump maps out a little bit more than they probably should be just so that when he's rendered from a distance you can see the texture better. Next time I design characters I'll put more thought into scale!

He still needs a shirt or jacket or something. I also need to make it look like he's bloodied up...

Saturday, February 12, 2011

Props

Here are some props that I'm still working on for the scene that takes place in the study. I'm still working on the couch, but I think the glass is finished. I just through the textures/materials onto these to see what the models look like--they will change completely! I still need to learn how to do a couple things with refractions and making it appear that these are REALLY made of wood, glass, fabric, etc.

Monday, February 07, 2011

Human Face

Started putting together the model for the female character's face. I was guided by a tutorial on Digital Tutors to create a "stylized female", but this is the first time I've built something to my own specs. The tutorial got me off to a nice start because I learned about creating good geometry around the eyes & mouth for animation, however I've had to deviate quite a bit because the demo model never gets as complex as mine. Still need to smooth some areas out and want to make the eyes more realistic with proper skin folds. (plus the ears!)

Thursday, February 03, 2011

Polygon & Sub-D Workflows: Part B

Here's my (semi-final) Raptor. The next steps in the project were to build the head which I did by extruding ribbon-shapes that followed curves down a set path and then connected those points. I went even farther than the images posted with some sub-d modeling to add ridges to the head and knuckles, but it was taking too long to get renders.

Instead I added shaders and lights to the lower res poly model--something that wasn't covered in this tutorial at all. I got an opportunity to play with sub-surface scattering (although I don't really know what I'm doing!) and creating semi-realistic shiny scales from processed textures. I plan to take one step back and follow the next tutorial series which goes through making a UV and painted textures for this beast.

Sunday, January 30, 2011

Polygon & Sub-D Workflows: Part A

Starting the next tutorial, this time building a Raptor. Boy it's refreshing to work with organic shapes! Started out by putting image planes of drawings of the Raptor from the Front, Top, and Side, then began building the forms.

You can see that there is a weird thing happening with the connection of one of the toes onto the foot in the second picture. I figured out that I had the normals reversed before I connected the pieces together and solved the issue. (I also had that problem with the Arm) Not sure how the normals got flipped on me, but oh well!

Introduction to Modeling: Part B

This project started out really badly (Part A), where I built the little cap that is reused in each layer of the Swiss Army Knife. I had to switch between Sub-D & Polygons, which caused me a lot of problems. I think I have a better handle on how to work between the two methods now, because the rest of the knife came together pretty smoothly. Used a lot of different techniques with Polygons, Sub-D, and Nurbs. Plus learned how to do some simple clean-up to get 4-sided polys.

I was disappointed that the texturing aspect of this lesson didn't teach how to create the same photo-realistic look from the demo pictures. It just used some basic blinns for everything, so I played around with adding my own materials, lighting, and a basic backdrop. The one thing I wasn't able to do was get a Swiss Army logo to project onto the enameled surface. Will probably learn more about this in texturing lessons.